Lead Capture in Activity Stream is a powerful feature designed to help you capture and manage leads more effectively. This guide will walk you through setting up and utilizing these campaigns.
Understanding Lead Capture
Lead Capture is designed to replace previous opt-in forms and provide a more robust method for lead capture. They can be used for a variety of purposes:
- Pre-sale campaigns: Collect sign-ups for upcoming events or shows to build an audience for exclusive pre-sales.
- Website integration: Easily embed forms into website footers or as interstitial ads.
- Reducing CSV transfers: Minimize the need for manual CSV file transfers within the Activity Stream system.
Data Collection with Lead Capture
When you collect leads, you can gather the same amount of data as a full customer record. While all fields are optional, common fields include:
- First Name
- Last Name
- Email Address
- Date of Birth
- Country
- Postcode
Important Note: You cannot overwrite the names of these standard fields. This ensures consistency and prevents forms from being used for unintended purposes, like collecting restaurant reservations or dietary requirements.
Navigating the Lead Capture Interface
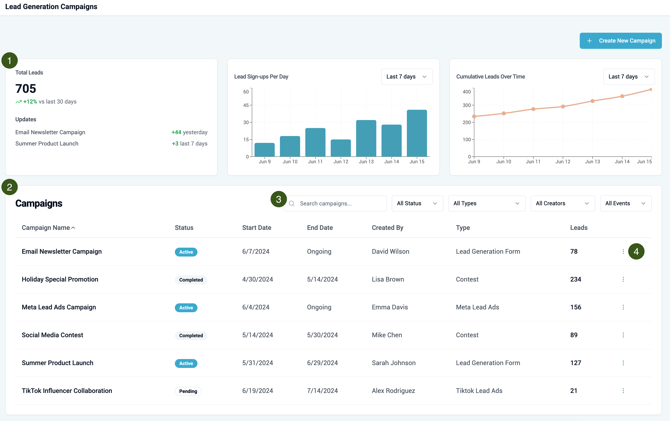
- Dashboard View: Across the top, you'll see total leads, leads per day, and cumulative leads over time. By default, this shows data across all campaigns, but you'll be able to filter it for a specific campaign using an action button. Date filters (e.g., last 30 days, last 90 days) will update the charts.
- Campaigns Table: This table lists your individual Lead Creation Campaigns. Examples could include:
- Website footer signup form
- Waiting list for a specific production or event
- Pre-sale campaign for a specific production or event
- Campaign Search and Filtering:
- Search: Easily search for specific campaigns.
- Status: Campaigns have three statuses based on their start and end dates:
- Active: The campaign is currently within its defined start and end dates.
- Completed: The campaign has passed its end date.
- Pending: The campaign's start date has not yet been reached.
- Campaign Types: Two primary types are available: "Lead Gen" (ongoing, no end date needed) and "Contest" (typically with a start and end date).
- Creator Filter: You can filter campaigns by the user who created them.
- Production/Event Association: Campaigns can be linked to specific productions or events, allowing for targeted reporting.
- Tags: You can apply custom tags to campaigns (e.g., for co-producers, paid/comped campaigns). This library of tags will be maintained across all campaign types.
- Campaign Actions: By clicking on the three dots in the right-most column, you can perform a number of actions on each campaign.
- Edit Campaign: Modify the settings and form of an existing campaign.
- View Leads: Access the leads collected by a specific campaign.
- Embed and Share: Generate code to embed forms on your website or get a direct link to a hosted version.
Managing Leads within a Campaign

When viewing an individual campaign, you'll see:
- Total Leads: Overall number of leads collected.
- Leads Collected Today: Number of leads gathered on the current day.
- Search within Leads: Search for specific leads within that campaign.
- Filter by Tags: Filter leads based on the tags applied to them (tags are specific to the campaign).
- Filter by Time Period: Filter leads collected within a specific timeframe (useful for contest winner selection).
- Bulk Actions: When you select one or more leads, a bulk action menu appears.
- Add/Remove Tag: Apply or remove tags from selected leads. You can create new tags on the fly.
-
- Export Leads: Export all leads or individual leads based on your selection.
Creating a New Lead Capture Campaign
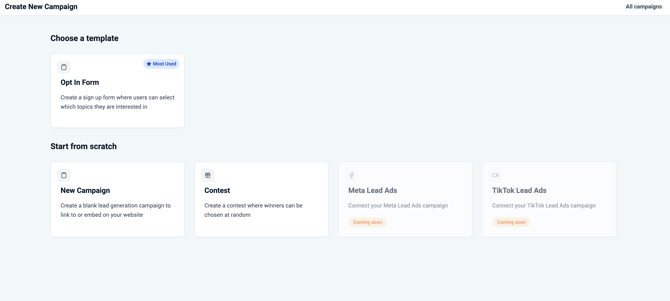
When creating a new campaign, you can choose to "start from scratch" or "choose a template" (which essentially uses the same form structure with slight front-end adjustments for contest types).

Form Builder Steps:
- Campaign Details
- Campaign Name (Required): Give your campaign a descriptive name.
- Association with Event/Production (Optional): Link the campaign to a specific event or production for reporting and filtering.
- Start Date (Mandatory): By default, this is set to the current date and time.
- End Date (Optional): Define an end date for time-limited campaigns (e.g., contests). For ongoing campaigns (e.g., website footers), leave this blank.
- Form Settings:
- Header Image: Upload a 16x9 header image.
- Form Title and Description: Use a rich text editor to add bolding, hyperlinks, and adjust text alignment.
- Button Text: Customize the text on the submission button (default is "Submit").
- Button Colors: Change the button text and background colors to match your brand.
- Submission Behavior (for non-contest campaigns):
- Redirect to Page: Send users to a specific "thank you" page on your website.
- Show Message: Display a custom "thank you" message directly on the form.
- Form Fields and Opt-in Settings:
- Field Management: Turn fields on/off, mark them as required, and reorder them. Default fields include email address, first name, and last name.
- Marketing Opt-ins and GDPR: Comprehensive management for marketing consent and GDPR compliance is available.
- Opt-in Modes:
- All Leads Opted In: Users who subscribe are automatically opted in. You can also set default hidden topics that apply to all subscribers.
- Selectable Topics: Present a list of existing topics, and users can select which ones they want to opt into.
- Explicit Opt-in Checkbox: Users must actively tick a checkbox to opt in. This checkbox text is editable, and you can hyperlink to your privacy statement.
- This functionality is consistent whether you're running a regular lead generation campaign or a contest.
As always, we're here to help! If you have any questions, or want more information on creating or managing Lead Generation Campaigns, let us know!